Don’t feel like reading through this whole document? Just download the GoogleDocs Template and watch this quick two-minute video to get up to speed.
Most Ph.D.s on the market will apply to anywhere from 20-60 jobs, and keeping track of all those deadlines, required documents, and status updates can be incredibly daunting. This organizational system, which I developed during my own job search, consists of two synergistic components:
- A GoogleDoc spreadsheet/database for tracking
- A folder creation and utilization method for recording and reference
Which sounds much more complicated than it actually is. The basic idea is that a good job search organizational method must allow you to do the following:
- Keep on top of deadlines
- Quickly locate all relevant information about a given position and institution, including the specific contents of the application package you submitted
- Add additional information as it comes in, such as requests for more materials, interviews, etc.
- Access both your database and your documents anywhere, from multiple devices
- Maintain a comprehensive record of everywhere you applied to and what exactly it led to
Below is a step-by-step guide to creating and using this system. (2-minute video instructions here).
STEP ONE: SETUP
- Install the Job Search Tracking GoogleDoc template. You’ll need to sign up for a Google account if you don’t already have one. Open the link, then click File>Make a Copy.
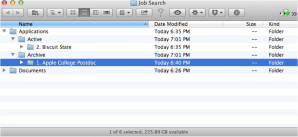
- On your computer hard drive or cloud, create a folder somewhere memorable (like the Desktop), and call it “Job Search.” Within that folder, create two more: “Documents” and “Applications.” Within “Documents,” create another folder called “Archive,” and within “Applications” two more: “Active” and “Archive” (see image below, click to enlarge; or check out the video).

- As you develop drafts of your application documents (basic cover letter, CV, etc.), put them in the “Documents” folder, making sure to assign them descriptive names. With each new iteration, move the previous draft into the Documents/Archive folder.


STEP TWO: POPULATE
As you find jobs you wish to apply to, fill in the relevant columns on the GoogleDoc spreadsheet under the “Active” tab. Make sure to continue the numbering of the “ref #” column as you apply to 20+ jobs.

STEP THREE: APPLY
- When you are ready to begin applying to a job, first create a new folder in the Applications\Active directory, naming it with the corresponding ref #.

- Copy (not move) the relevant documents you’ll need out of Documents, and paste them into your newly created folder from #2, appending the name of the institution (see below).

- Open the newly pasted files and start tailoring them to the specific position, leaving the original “form” versions (in Documents) untouched.


STEP FOUR: MAINTAIN
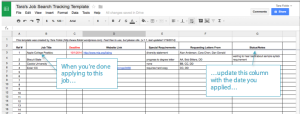
- After you’ve applied to a job, open up the GoogleDoc, update the “Status” cell with the date you applied, select the relevant row, and cut and paste it under the “Applied” tab (see three images below). Use the same procedure for jobs you decide not to apply to, but paste them under the “Not Applying” tab.


- Do the same in your file system: drag the finished application folder to Applications\Archive.


STEP FIVE: RECONNAISANCE
- As you get requests for additional materials, update the corresponding “Notes” cell with a record of when you got the request and what documents you sent in response (make sure you also have a copy of those documents in the corresponding file folder).
- Similarly, when you get interviews or flybacks, copy and paste the relevant rows into the corresponding tabs (“Interviews” and “Flybacks”), then fill in the additional information on those sheets so that you have a complete schedule of your interviews and can avoid double-booking yourself when another school calls.
- As you prepare for your interviews and visits, you can easily refer back to the documents you sent by scrolling through your Applications\Archive directory for the relevant Ref #. I’d also recommend making a copy of that specific folder and backing it up either in the cloud or on the tablet or phone you’ll be bringing to the interview.
Additional Tips
- As you begin to add more jobs to your “Active” Googledocs sheet, make sure to sort the “Deadlines” column (so that the soonest deadlines appear first) by clicking on Column C and selecting “Sort sheet A -> Z”.

- Depending on how involved your advisor is/wants to be in your job search process, you may wish to share this document with them so that they know exactly where you’re applying. Click “Share” in the top right-hand corner and enter their e-mail address; this way, they’ll always have access to the most updated record of your progress.
- If your profile changes at some point during the season (an article you submitted got accepted, you received a fellowship) and you want to notify schools you’ve already applied to, you should:

-
- create an updated version of your CV (place the previous draft into Documents\Archive)
- On your GoogleDoc, note each school under the “Applied” tab that has the old version of your CV
- Add a note under “Status” documenting the date (and to whom) you’re sending the new CV
- Copy and paste the new CV into each of the corresponding folders, which you can easily find via Ref #
- Contact each school and send them the updated CV
